DYI wooden habitat for dwarf hamster

jaddaj

New member
Member
Messages
5
Reaction score
9
Points
3
Hi everyone!

I’m planning to build a new habitat for my Roborovski dwarf hamster, and I’m really excited about it! The space will be 960 square inches, which I think will give him plenty of room to explore and play.

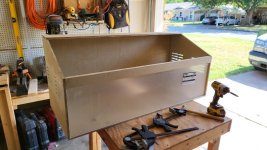
I sketched an idea tonight to visualize the design, and I’d love to hear your thoughts! I want to make sure it’s not only spacious but allows for many stimulating platforms and toys for my little guy.

Any suggestions on layout, accessories, or materials would be greatly appreciated. Thanks in advance for your help!

Looking forward to your feedback!
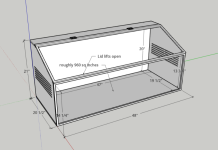
 

Attachments

  • Screenshot 2024-08-07 212810.png
    Screenshot 2024-08-07 212810.png
    126.8 KB · Views: 6
hey, it looks amazing hmm i guess this will need wood and glass for building. i have a few suggestions for you make sure to have a large bedding so your hamster can dig in and about accesories and other things you can make a cardboard multi chamber hideout like there is youtuber named victoria raechal she is amazing with hamster and you can find how to make a multichamber hideout from one of her videos and if you are not low on budget you can even buy one and you will need enrichment yk dried herbs, sprays, different substrate, sand bath, and wood branches sticks and etc the important part is the wheel you can make one or buy one
 
Hello and welcome. It looks a great design. One of the main things is to ensure there is enough ventilation. I can see there are ventilation slots down the side but I would suggest it needs more than that as well. One way to achieve excellent ventilation would be if either the front section or sloping open top section was meshed (you'd need 1cm squared mesh or smaller). Which might also save on cost of plexiglass or glass :-) The mesh is quite cheap really. If you don't want to do that then I would at least put some more ventilation slots along the narrow piece on top, and along the rear section as well so air can circulate up as well as sideways.

It's lovely you're getting a Robo :)
 
I plan to use glass/plexiglass on the front, and a screen material for the top/lid. I designed this to be able to put 8 to 10 inches of deep bedding. I plan to build my hides, multichambered hideouts, and toys. I'm an avid woodworker so this should be a fun distraction. I plan to purchase herbs, (ones I don't already grow) sprays and incorporate a large sand area (maybe 1/8th of the floor space).
 
I wanted to update. I still have a ways to go, but the shell is built. I'll take the protective cover off the plexiglass when it is finished. I also created a divider for the middle. I will put both hamsters in this cage until I can build the second one.
 

Attachments

  • tmp_e1f108a9-948e-46fa-952c-12f7b1b5a5fa.jpeg
    tmp_e1f108a9-948e-46fa-952c-12f7b1b5a5fa.jpeg
    79.9 KB · Views: 7
  • Love
Reactions: Maz
It looks fantastic! How big are the ventilation slits? Just thinking they need to be roborovski-proof! Are they bigger than 7mm? If they are you could always attach some mesh over them on the outside maybe. Ideally it could do with some ventilation at the back as well. Or if not, on top.
 
It looks fantastic! How big are the ventilation slits? Just thinking they need to be roborovski-proof! Are they bigger than 7mm? If they are you could always attach some mesh over them on the outside maybe. Ideally it could do with some ventilation at the back as well. Or if not, on top.
They're approximately 1cm in size. I plan to use the same mesh to cover the vents on the lid. I've read that Mod Podge, being a PVA adhesive, is pet-friendly. My plan is to paint the interior white with milk paint and then seal it with Mod Podge. Before sealing, I'll attach the mesh to the vents and secure the edges to ensure it stays in place.
 
Last edited:
You sound very organised :-)
 
I have moved Fred and George into their new home. I plan to build another and remove the center divider. That will Gove each one about 900 sq inches of space. Then I'll build more levels, and start adding more enrichment items. It is a floating style habitat that is painted on the outside with the color to match our accent wall. Inside is pet friendly white topped with mod podge. They seem very happy.
 

Attachments

  • 20240824_202335.jpg
    20240824_202335.jpg
    82 KB · Views: 6
So do you have two roborovskis each in their own half in there? The cage looks good - a very clever build. Is it my imagination or is it suspended on the wall?! :)

They have lots of nice bedding and one each would be better space. For now I would add a little bit more at floor level - just cardboard tubes or old tissue boxes as hides are fine. Kitchen roll inner tubes or pringles tubes wiped out make good floor tunnels. Also you can make a hide or treat tray out of cardboard egg boxes with a hole cut in (for a hide). I use the bottom half with the pointy pyramid bits as a kind of treat area.

Just wondering if the wheels are big enough - it's hard to tell from the photo :)
 
Back
Top