

- Messages
- 4
- Reaction score
- 3
- Points
- 33
Hi folks. I’ve started getting the itch for a hamster again and figured I’d be replacing my existing enclosure before getting another little roommate. I also figured I’d be keeping track of it here! 
I don’t think I’ve introduced ever introduced myself, ahah. My name is Alex, a student in the Netherlands and I’ve been keeping hamsters off and on since 2015. In the spoiler below a bit of history about my hamster keeping and their enclosures since then. Not relevant for the DIY, I promise!
My previous enclosure was a good one for the time it lasted (about nine years, and I’m quite confident it could have lasted a little longer had I treated it a bit better), but it had a couple of issues. For ease of viewing, I’ll just elaborate on them in the spoiler below.
I wanted something different. I’ve been in the (online) hamster community long enough to have seen gorgeous aquarium or even terrarium setups, so I knew I wanted something like that. Considering the height of the cabinet the enclosure would be on, I knew I’d want it to be a terrarium-style enclosure, either with front-opening doors or (preferably, the dream) sliding doors. Ideally, the enclosure would be as large as the entire cabinet to give the hamster as much space as possible, so that would make for an enclosure of L180 x D50 x H60 cm (70.8 x 19.6 x 23.6 in). I kept an eye on online marketplaces, but I haven’t seen the Dutch hamster community (typically) go much larger than 150 cm long for their enclosures and so few people get a terrarium with sliding doors at the desired height (at least 25 cm)—I knew this would likely be a long shot. So, I started checking out if anyone could build me a terrarium of that size. Otherwise, I'd DIY it.
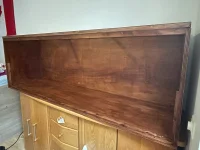
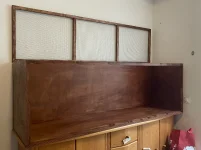
...so far, at least.
Inner measurements are ~175 cm (note to self: don’t trust the underpaid hardware store teens to cut things to size properly… (I also don’t blame them—I should have double-checked)) x 48 cm, making for an uninterrupted floor space of 8400 sq / 1302 sq in. I’m very stoked about it.
The base is made from (unspecified, but most likely pine or spruce) hardwood plywood, which I stained to be darker and then varnished. Both the stain and the varnish are water-based and non-toxic. The lid is made from spruce planks I cut at an angle using a miter saw and 5 mm wire mesh. It sits flush with the enclosure and is attached to the enclosure using four hinges placed at the back. I used wood filler to fill in any errors (as Ollie said so eloquently, “Wood filler and paint make the carpenter you ain’t.”) which is, say it with me, non-toxic and water-based. The back and one of the sides of the enclosure aren’t varnished or stained as they won’t be visible. This may bite me in the butt if I ever decide to change my room’s layout. We shall see.
And… that’s where I’m at for now. I’ve done basically everything I can think of doing for now. Glass has been ordered for the substrate border, but that won’t be arriving until the end of September, and I can’t work on the profiles or sliding doors until the bottom piece of glass is in. I can’t get to work on the rest until that is in place. I still want to install some locks just to give myself more peace of mind for the front of the lid and probably the sides, but I haven’t found anything suitable quite yet.
I guess in the meantime I’ll keep myself busy working on some DIY hides. Here’s one that’s been finished!
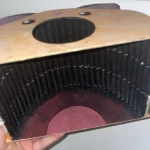
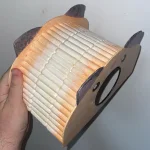


Materials used:
3mm plywood (I recommend going a bit thicker; this splinters quite easily)
Wooden dowels (these are birch, 10mm x 4 mm)
Elmer's glue (non-toxic, water-based PVA glue)
Tempera paint (non-toxic, water-based. Always check the label!)
Varnish (non-toxic, water-based)
In the works are still an acorn hide and a snail hide. I'll post those here too once they're done.
Thanks for reading!
I don’t think I’ve introduced ever introduced myself, ahah. My name is Alex, a student in the Netherlands and I’ve been keeping hamsters off and on since 2015. In the spoiler below a bit of history about my hamster keeping and their enclosures since then. Not relevant for the DIY, I promise!
I started out with a Zooplus Alaska wired hamster cage, which was 84 x 48.5 x 44 cm (33 x ~19 x ~ 17 in) enclosure, totalling to 4074 sq cm (~631 sq in) of floor space. After my first hamster Milo passed, I decided to upgrade to a larger DIY enclosure I built with my dad, which was 120 x 50 x 60 cm (~47 x ~19.6 x ~23.6 in), or 6000 sq cm/930 sq in. This one was made of plywood, a plexiglass front and a removable spruce-and-mesh lid. This enclosure has served me faithfully across six more hamsters, most of whom I adopted through either a hamster adoption agency or directly from people rehoming their hamsters, usually through second-hand websites. Most of these hamsters were at least year or older when I got them and lived the rest of their lives with me, which is why it may look like I ran through them so quickly. ^-^; The last hamster I had was a Honey banded long-haired Syrian named Graham, whom I got from a reputable breeder. He lived to be 28 months old.
After this many years, this many hamsters, and three times moving house, though, this enclosure was looking worse for wear. After Graham passed I decided I’d be upgrading before getting another hamster. The DIY I had was spacious enough for the essentials and enrichment, but especially with the two female Syrians I had, I noticed they really wanted more living space than what I could offer them in that enclosure.
After this many years, this many hamsters, and three times moving house, though, this enclosure was looking worse for wear. After Graham passed I decided I’d be upgrading before getting another hamster. The DIY I had was spacious enough for the essentials and enrichment, but especially with the two female Syrians I had, I noticed they really wanted more living space than what I could offer them in that enclosure.
My previous enclosure was a good one for the time it lasted (about nine years, and I’m quite confident it could have lasted a little longer had I treated it a bit better), but it had a couple of issues. For ease of viewing, I’ll just elaborate on them in the spoiler below.
- The enclosure was sat on a piece of furniture that made it quite difficult to reach things on the inside due to its height. Altogether it was about 1,5 meters (5 ft) tall, which usually meant taking off the lid in its entirety and craning my arm inside at an awkward angle that would have the plexiglass digging into my armpit. A couple of years ago I acquired a different furniture piece that was even taller, so now I couldn’t even reach inside without standing on a step stool. Same armpit issue. Annoying.
- Over the years, the plexiglass front (4 mm thick) bent simply due to the weight of the bedding inside. This is just something that happens with plexiglass when the bedding depth is 25-30 cm (9.8-11.8 in) and compressed over a relatively large area. It wasn’t ever a safety issue—it didn’t ever bend so far as to cause gaps at the sides, but that didn’t make it any less annoying aesthetically.
- The plexiglass scratched easily. I was living at home with my parents when I made the enclosure, and our cats did jump on top of and sit on top of the enclosure on occasion when the hamster was inactive. Again, just a consequence of the choice of the material meeting sharp cat claws. It didn’t impede my ability to view my hamsters clearly, but over the years (and three moving houses) did scuff it up significantly.
- I couldn’t access the hamster from the front of the enclosure. I’d have to reach inside like an arcade claw machine predator hybrid, the last year even while standing on top of a stool, to interact. It wasn’t particularly comfortable for the hamsters or for me. It never interfered with bonding or interacting—I’d just lift them out the enclosure and put them in a playpen, but it was a bit of a hassle to just give them a quick treat.
I wanted something different. I’ve been in the (online) hamster community long enough to have seen gorgeous aquarium or even terrarium setups, so I knew I wanted something like that. Considering the height of the cabinet the enclosure would be on, I knew I’d want it to be a terrarium-style enclosure, either with front-opening doors or (preferably, the dream) sliding doors. Ideally, the enclosure would be as large as the entire cabinet to give the hamster as much space as possible, so that would make for an enclosure of L180 x D50 x H60 cm (70.8 x 19.6 x 23.6 in). I kept an eye on online marketplaces, but I haven’t seen the Dutch hamster community (typically) go much larger than 150 cm long for their enclosures and so few people get a terrarium with sliding doors at the desired height (at least 25 cm)—I knew this would likely be a long shot. So, I started checking out if anyone could build me a terrarium of that size. Otherwise, I'd DIY it.
The first two options I was looking into were… unsuccessful. I would on occasion find a second-hand aquarium of around that size (or even larger at 2 meters; what a dream), but they’d be too far away for a single car-less, drivers licence-less student, even when aided by friends, to move anything that size. The terrarium builders I reached out to had varying responses. At least two didn’t make them that large, one couldn’t give me a price or timeframe because their builder was out, and the one who could meet my requirements, had a hefty price attached to it. Considering the amount of labour and size and weight, was it fair? Sure. Would it be worth it? Absolutely. Was it in my budget, as a student? Most definitely not. I found one who could make it for a better price, but as they're located in Germany, it was a little iffy a) whether or not they'd be able to drive it to my location as I live just on or outside of their delivery range, and b) the price for the enclosure and delivery would basically amount to the same price as paying for an enclosure in my country. I was also slightly concerned my dresser wouldn’t be able to handle the weight of a full-glass enclosure. It’s a good piece of furniture, don’t get me wrong, but nearly two meters of 5mm glass is heavy. And on top of that, I’m also likely to move to a more permanent house at some point in the next five years and would have to move it then. So that weighed (ha) in a bit as well.
I figured, why not pull a SomethingAnimal and just DIY my enclosure? I’d done it before myself with platforms and hides, and I’d done it before with Dad for the entire enclosure I had before. How difficult could it be?
So I did research. I dug up my rusty sophomore-level German skills from high school and started checking out Das Hamsterforum, for in Germany, apparently, they’re a lot more DIY-savvy when it comes to large enclosures than they are in the Netherlands. (My German reading comprehension has improved a little since then. Speaking… not so much.) I found tutorials for how to make sliding doors myself using U-channels and real glass and all that fancy stuff. I designed, and I got to work.
I figured, why not pull a SomethingAnimal and just DIY my enclosure? I’d done it before myself with platforms and hides, and I’d done it before with Dad for the entire enclosure I had before. How difficult could it be?
So I did research. I dug up my rusty sophomore-level German skills from high school and started checking out Das Hamsterforum, for in Germany, apparently, they’re a lot more DIY-savvy when it comes to large enclosures than they are in the Netherlands. (My German reading comprehension has improved a little since then. Speaking… not so much.) I found tutorials for how to make sliding doors myself using U-channels and real glass and all that fancy stuff. I designed, and I got to work.
...so far, at least.
Inner measurements are ~175 cm (note to self: don’t trust the underpaid hardware store teens to cut things to size properly… (I also don’t blame them—I should have double-checked)) x 48 cm, making for an uninterrupted floor space of 8400 sq / 1302 sq in. I’m very stoked about it.
The base is made from (unspecified, but most likely pine or spruce) hardwood plywood, which I stained to be darker and then varnished. Both the stain and the varnish are water-based and non-toxic. The lid is made from spruce planks I cut at an angle using a miter saw and 5 mm wire mesh. It sits flush with the enclosure and is attached to the enclosure using four hinges placed at the back. I used wood filler to fill in any errors (as Ollie said so eloquently, “Wood filler and paint make the carpenter you ain’t.”) which is, say it with me, non-toxic and water-based. The back and one of the sides of the enclosure aren’t varnished or stained as they won’t be visible. This may bite me in the butt if I ever decide to change my room’s layout. We shall see.
And… that’s where I’m at for now. I’ve done basically everything I can think of doing for now. Glass has been ordered for the substrate border, but that won’t be arriving until the end of September, and I can’t work on the profiles or sliding doors until the bottom piece of glass is in. I can’t get to work on the rest until that is in place. I still want to install some locks just to give myself more peace of mind for the front of the lid and probably the sides, but I haven’t found anything suitable quite yet.
I guess in the meantime I’ll keep myself busy working on some DIY hides. Here’s one that’s been finished!
Materials used:
3mm plywood (I recommend going a bit thicker; this splinters quite easily)
Wooden dowels (these are birch, 10mm x 4 mm)
Elmer's glue (non-toxic, water-based PVA glue)
Tempera paint (non-toxic, water-based. Always check the label!)
Varnish (non-toxic, water-based)
In the works are still an acorn hide and a snail hide. I'll post those here too once they're done.
Thanks for reading!

 It was great reading about your journey and history and your amazing diy tank that lasted 9 years! And I completely get the reaching from the top thing. I think many of us started out with an Alaska cage or similar all those years ago - and it was seen as big! Mine was a Savic Mickey 2XL which also seemed big at first but within a year I upgraded to a 100cm Barney cage (and they are still sold at Zooplus).